The retirement of free web hosting options from Dropbox and Google Drive has sent a lot of folks scrambling to find a good replacement. Many folks have followed Tom Kuhlmann’s instructions for moving their elearning courses and portfolios over to Amazon S3.
I’d like to introduce you to another great option: Google Cloud Platform.

The free tier gives you 5GB of storage with additional space available at a minimal cost.
We’ll walk through these steps for setting everything up and sharing your courses and portfolios on the Google Cloud Platform:
- Create an account
- Create a bucket
- Upload your files
- Share your files
Creating Your Account
- Sign-up for a free Google Cloud Platform account at https://cloud.google.com/free/
- Create a Cloud Platform project on the Manage Resources page: https://console.cloud.google.com/cloud-resource-manager

- Enable billing for your project.
https://support.google.com/cloud/answer/6293499#enable-billing
Creating a bucket
To create a bucket:
- Open the Cloud Storage browser in the Google Cloud Platform Console.
https://console.cloud.google.com/storage/browser
- Click Create bucket.
- In the Create bucket dialog, specify:
- The Name of your bucket.

- The Storage class for your bucket: Multi-Regional.
- The Location of your bucket: United States.
- The Name of your bucket.
- Click Create.
- If successful, you are taken to the bucket’s page with the text “There are no objects in this bucket.”
Make your bucket public
You can change access settings on a file by file basis but for e-learning courses comprised of hundreds of individual files, setting the bucket to be public by default is a worthwhile time-saver.
- Open the Cloud Storage browser in the Google Cloud Platform Console.
https://console.cloud.google.com/storage/browser - Click the drop-down menu associated with the bucket that you want to make public.
- The drop-down menu appears as three vertical dots to the far right of the bucket’s row.
- Choose Edit bucket permissions.
- In the Add members field, enter allUsers.
- In the Select a role drop down, select the Storage sub-menu, and click the Storage Object Viewer option.
- Click Add.
Uploading your course files
The next step is uploading the course files to your bucket:
- Open the Cloud Storage browser in the Google Cloud Platform Console.
https://console.cloud.google.com/storage/browser - In the list of buckets, click on the bucket you created.You may want to organize your bucket by creating folders for each separate course.
- Click Upload files.
(Alternatively, you can drag your files into this window) - In the file dialog, browse to the desired file and select it.
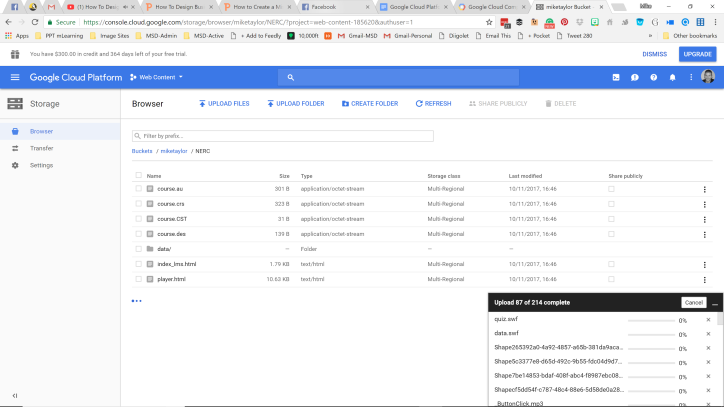
After the upload completes, you should see the file name, size, type, and last modified date in the bucket.
When you’re all done you can use your public link to share your project:
https://storage.googleapis.com/miketaylor/IDtheft/story.html
Additional supporting information
Costs
Free tier info: https://cloud.google.com/free/
See the Monitoring your storage charges tip for details on what charges may be incurred when hosting a static website, and see the Pricing page for details on Cloud Storage costs.
FAQs
https://cloud.google.com/free/docs/frequently-asked-questions
Sharing individual files
To share publicly the files that you want to serve:
- Open the Cloud Storage browser.
https://console.cloud.google.com/storage/browser - In the list of buckets, click on the bucket that contains the objects you uploaded.
- For each object you want to share publicly, click the checkbox in the Share publicly column.
If successful, a link titled Public link appears next to the checkbox. This is the link you click to view your content. For example, for a storyline course, you’ll click the public link for story.html.

Mike, great how to — one thing I can’t get right though, what format are you publishing your course content in? I’m using Articulate 2 if that helps. Thanks
LikeLiked by 1 person
Thanks, Evan. If you publish for the “WEB” you should be all set for this. But let me know if you have any other questions or any trouble with it.
LikeLiked by 1 person
Hi Mike – do you know if this works with the html file from a Storyline output folder?
LikeLiked by 1 person
Hi, Olivia! Yes, it does work with Storyline output. Just upload the html file along with all the other files & folder that are created when you publish. Here’s one of mine https://storage.googleapis.com/miketaylor/IDtheft/story.html
LikeLike
This is exactly what I was looking for! Thank you so much!
LikeLiked by 1 person
Awesome, Natalie. So glad to hear it is helpful!
LikeLike
Thanks for sharing this, Mike. I’ve been putting off migrating my portfolio since Google disabled hosting on Drive.
I finally got around to setting this up today and it worked perfectly – even my Google Analytics tracking!
One minor suggestion, though. I didn’t have to set up billing for my project. It seems to default when you only have one billing account.
Keep up the good work!
Simon
LikeLiked by 1 person
I’m so glad to hear that it went so smoothly, Simon. I love it when a plan comes together! Good to know about the billing account..thanks!
LikeLike
Thanks for sharing Mike. What would be the pricing once it goes out of free tier..?
LikeLike
Hi, Nalin. I’ve never gone over. The only thing I could do is look for pricing on their website.
LikeLike
Thank you for this article! I came across this when I was stuck in rut and don’t know what to do next with my published for web storyline project. Now I can share this to my colleagues and we can review it for improvement. Thanks a bunch!
LikeLike
Awesome, Kim! Thanks for your note. I’m so glad to hear it was helpful.
LikeLike
Noob problem – I’ve followed the instructions but no public link opens the project. Different links open different parts of the project but there isn’t anything to open it entirely… I’ve tried them all!
LikeLike
Hi, Caleb! If you’re working with Storyline look for the story.html file. There should be a column labeled “Public access”. Click the icon next to that to launch your course. (It is a bit hidden and not very intuitive.)
LikeLike
Hey Mike, this is great, thanks so much. Have you ever been able to share your files on Google Cloud without making it completely public? I want to share it just to a particular google domain using the bucket permissions. I can successfully do this with other file types but when it comes to getting a course to play it wont work. The Link URL in the object details just returns a Not Found error. Any help would be appreciated.
LikeLike
Hi Matthew! I haven’t tried that. I’d be curious to hear if you figure it out. Thanks!
LikeLike